
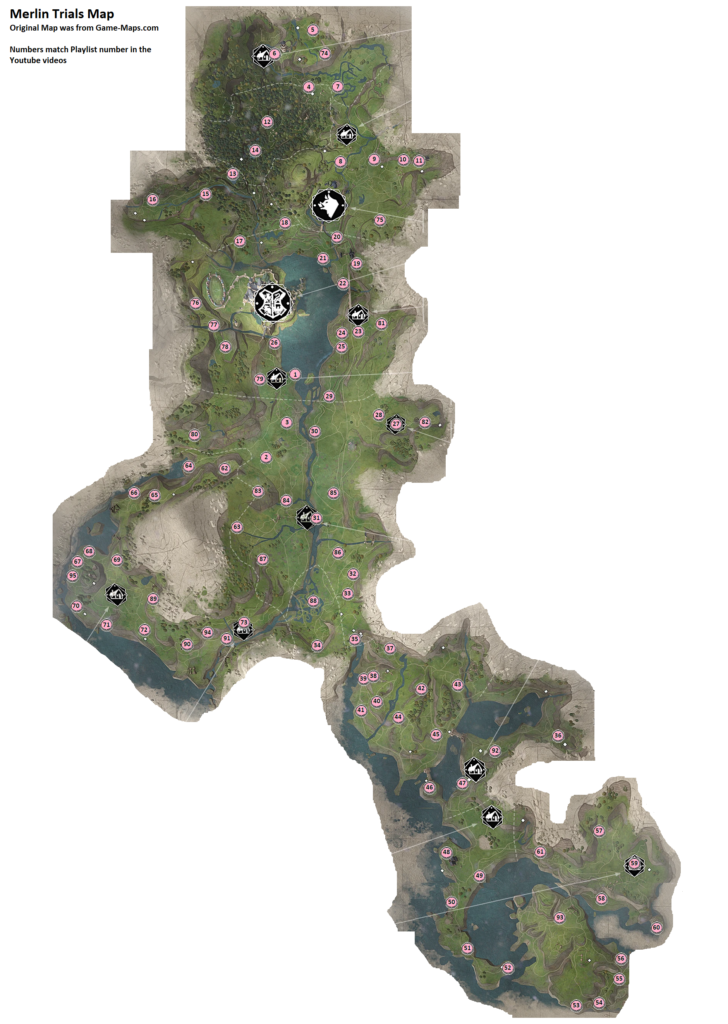
This is a map of all 95 Merlin Trials. The numbers correspond to the table below the map as well as the video number in the Merlin Trials Playlist on my Youtube Channel: Merlin Trials Playlist
Note that all of these are also listed with region in the Google Workbook.
I am unable to control the font size or widths of the columns in WordPress apparently, so it’s best if you copy and paste the table to your own computer where you can size it best.
| No/Location | Spell(s) | Description |
| 1 – Trials of Merlin | Confringo | Light the 3 pyres |
| 2 – Goblin Camp south of Lower Hogsfield | Accio or Wingardium Leviosa | Roll the balls into the depressions. This is the Cart’s Away Goblin Camp location. There are 2 piles of balls inside the camp and one 1 outside. On the east side. |
| 3 – South of Lower Hogsfield | Basic | Destroy the 9 orbs. This will be on the map after completing the first one with Nora. Look around and then the last one on the top of the tallest nearby rock. |
| 4 – North Ford Bog Entrance | Touch the tops | Amongst the ruins. See the columns around the back. Get on a lower box and shoot off all the stacked stones, then jump to the top of all of the columns. If you miss one or touch the ground in any way you have to redo it. You cannot ride the broom on this one. |
| 5 – North Ford Bog | Confringo | Destroy the 5 boulders. |
| 6 – Pitt-Upon-Ford | Touch the tops | You can either climb/jump across the tops of all of them or ride your broom across as long as you brush the tops. |
| 7 – East North Ford Bog | Depulso or Wingardium Leviosa | Just behind the merchant by the cabin. Look southwest and use revelio to find a circle in the ground. Use a fire spell to remove the overgrowth. Look behind the circle you just cleared with revelio and up to find a large round boulder. Levitate and summon to get it into the circle. |
| 8 – South of Upper Hogsfield | Confringo | Destroy the 5 boulders. |
| 9 – East Hogsmeade Valley | Confringo | Light the 3 pyres. Facing east, there are 2 up on the right. Stand up there b/c you’ll need to destroy a rock wall to clearly get to the one to the far east. |
| 10 – Falbarton Castle West | Depulso or Wingardium Leviosa | Roll boulder down the hill. |
| 11 – Falbarton Castle East | Lumos | Move the moths into the 3 open holed boulders. First of all, to get in, start at the fast travel spot and cross the river. Look for a removeable grate and then climb up into the area. Use Lumos to get the moths to the boulders. For the moths in the climb up area, these moths stay where they were when she puts Lumos away, so you can climb up and still lure them further. |
| 12 – West Forbidden Forest | Lumos | Move the moths into the 3 open holed boulders. Near a Hippogriff Den. In the little covered area are glowy moths. Use lumos to direct it to one the boulder that’s glowy too. Another area needs to be burned by fire before you can get to them. Third – destroy the boulders covering the cave. |
| 13 – Jackdaw’s Tomb | Flipendo | Flip the top block so that the symbol, and it’s orientation, matches the one below. |
| 14 – Jackdaw’s Tomb East | Confringo | Light the 3 pyres. Be sure to know exactly where they are and the one by the tree needs to have spiderwebs removed. This is the one across from the cave entrance. |
| 15 – Between Jackdaw’s Tomb and Korrow Ruins | Reparo | Use reparo on 4 different statues that fall apart. This is the only one that has 4. The rest all have 3. |
| 16 – Korrow Ruins | Confringo | Light the 3 pyres. This is just down from the ruins. They’re pretty much equal distance from each other. Two on the other side of the wooden bridge. One is in the front ruins that needs have old vines burned off. Position yourself on the bridge where you can get the furthest one (the single), then move up the bridge and get the two on the other side. |
| 17 – Forbidden Forest | Basic | Destroy the 9 orbs. This is west of the Forbidden Forest fast travel marker. It’s across the river. |
| 18 – Collector’s Cave | Lumos | Move the moths into the 3 open holed boulders. This is southeast of the cave. |
| 19 – East Hogsmeade Station | Confringo | Light the 3 pyres. This is just south of the station kinda behind it. One is on the ground on the right behind a short wall. Light them left (by the tracks) to right (short wall) b/c the one on the right will dip the fastest. |
| 20 – North Hogsmeade Station | Basic | Destroy the 9 orbs. This is just north of the station. Go over the railroad bridge to get to it or ride your broom. Find and destroy the 9 round balls around. Look up and down behind the hill behind it. |
| 21 – West Hogsmeade Station | Touch the tops | You can either climb/jump across the tops of all of them or ride your broom across as long as you brush the tops. |
| 22 – South Hogsmeade Station | Lumos | Move the moths into the 3 open holed boulders. |
| 23 – Aranshire | Accio or Wingardium Leviosa | Roll the balls into the depressions. One set is down in front. |
| 24 – South of Aranshire | Lumos | Move the moths into the 3 open holed boulders. You have to work your way down the cliff towards the lake to find them all. There’s one above the camp too. |
| 25 – South of Aranshire | Depulso or Wingardium Leviosa | Roll boulder down the hill. |
| 26 – South Exit of the Castle | Depulso or Wingardium Leviosa | Roll boulder down the hill with depulso or wingardium leviosa. Between the castle and the pumpkin house that’s just before lower hogsfield. Not far from the South Exit. |
| 27 – Brocburrow | Depulso or Wingardium Leviosa | Roll boulder down the hill. |
| 28 – Brocburrow | Lumos | Move the moths into the 3 open holed boulders. |
| 29 – Central Hogwarts Valley | Confringo | Destroy the 5 boulders. |
| 30 – Central Hogwarts Valley | Confringo | Light the 3 pyres. They’re along the shore. Do the middle one last b/c it’s already in the ground. |
| 31 – Keenbridge | Depulso or Wingardium Leviosa | Right next to the fast travel spot. Behind Fatimah’s shop cart is a large round boulder. Take that across the bridge to the other side. |
| 32 – The Mine’s Eye | Wingardium Leviosa | Use Wingardium leviosa and NOT repel because if you use repel there’s a high probability of the boulder overshooting or going off in the wrong direction. |
| 33 – East South Sea Bog | Confringo | Light the 3 pyres. There’s a short one behind the crates near you. Destroy them first. |
| 34 – North Poidsear Coast | Basic | Destroy the 9 orbs. Two sets of 3 are down below. You can get them from the Merlin spot. |
| 35 – Inside North Poidsear Coast | Touch the tops | You can either climb/jump across the tops of all of them or ride your broom across as long as you brush the tops. |
| 36 – Tower Tunnel | Flipendo | Flip the top block so that the symbol, and it’s orientation, matches the one below. |
| 37 – Tomb of Treachery | Confringo | Light the 3 pyres. |
| 38 – West Poidsear Coast | Lumos | Move the moths into the 3 open holed boulders. One boulder is down the rail track. |
| 39 – West Poidsear Coast | Confringo | Destroy the 5 boulders. |
| 40 – West Poidsear Coast | Accio or Wingardium Leviosa | Roll the balls into the depressions. |
| 41 – West Poidsear Coast | Flipendo | Flip the top block so that the symbol, and it’s orientation, matches the one below. |
| 42 – East Poidsear Coast | Lumos | Move the moths into the 3 open holed boulders. |
| 43 – East Poidsear Coast | Reparo | Use reparo on 3 different statues that fall apart. One is up on the hill behind you. |
| 44 – East Poidsear Coast | Wingardium Leviosa | Move the boulder across the gap into its depression slot. |
| 45 – Marunweem Bridge | Wingardium Leviosa | Move the boulder into its depression slot. |
| 46 – Marunweem Ruins | Lumos | Move the moths into the 3 open holed boulders. |
| 47 – Marunweem | Touch the tops | You can either climb/jump across the tops of all of them or ride your broom across as long as you brush the tops. I have had the broom work and not work on this one, so if you want to use the broom and it isn’t working, try clearing off the loot bags first and destroying the barrel. |
| 48 – West Manor Cape | Confringo | Light the 3 pyres. |
| 49 – West Manor Cape | Flipendo | Flip the top block so that the symbol, and it’s orientation, matches the one below. |
| 50 – West Manor Cape | Wingarium Leviosa | Take the boulder up the hill. Depulso also works, but is a lot more work, lol |
| 51 – West Manor Cape | Lumos | Move the moths into the 3 open holed boulders. There are 2 sets of moths below, one under the tree, the other under the bridge. |
| 52 – West Manor Cape | Confringo | Destroy the 5 boulders. Note there are Ashwinders and an Infamous Foe here. |
| 53 – South Clagmar Coast | Reparo | Use reparo on 3 different statues that fall apart on rocks in the water. |
| 54 – South Clagmar Coast | Confringo | Destroy the 5 boulders. |
| 55 – Clagmar Castle | Basic | Destroy the 9 orbs. |
| 56 – Clagmar Castle | Flipendo | Flip the top block so that the symbol, and it’s orientation, matches the one below. |
| 57 – Cragcroft | Lumos | Move the moths into the 3 open holed boulders. |
| 58 – Cragcroft | Basic | Destroy the 9 orbs. |
| 59 – Cragcroft | Confringo | Light the 3 pyres. All 3 are along the street heading to the south. |
| 60 – Cragcroft | Touch the tops | You can either climb/jump across the tops of all of them or ride your broom across as long as you brush the tops. |
| 61 – Cragcroft Shore | Confringo | Destroy the 5 boulders. |
| 62 – West Hogwarts Valley | Confringo | Destroy the 5 boulders. |
| 63 – West Hogwarts Valley | Touch the tops | You can either climb/jump across the tops of all of them or ride your broom across as long as you brush the tops. |
| 64 – North Feldcroft | Flipendo | Flip the top block so that the symbol, and it’s orientation, matches the one below. |
| 65 – North Feldcroft | Touch the tops | You can either climb/jump across the tops of all of them or ride your broom across as long as you brush the tops. |
| 66 – North Feldcroft | Confringo | Destroy the 5 boulders. |
| 67 – Rockwood Castle | Confringo | Light the 3 pyres. |
| 68 – Rockwood Castle | Basic | Destroy the 9 orbs. |
| 69 – Rockwood Castle | Reparo | Use reparo on 3 different statues that fall apart. |
| 70 – South Feldcroft | Confringo | Destroy the 5 boulders. |
| 71 – South Feldcroft | Depulso or Wingardium Leviosa | Roll boulder down the hill. |
| 72 – Feldcroft Catacombs | Confringo | Destroy the 5 boulders. This one is just down from the catacombs and has a treasure chest in a rock alcove behind one of them. |
| 73 – Irondale | Basic | Destroy the 9 orbs. 3 near the fast travel spot, 3 behind the merlin spot up on a hill, 3 at the house by the windmill. |
| 74 – San Bakar’s Tower | FLipendo | Flip the top block so that the symbol, and it’s orientation, matches the one below. |
| 75 – East Hogsmeade Valley | Lumos | Move the moths into the 3 open holed boulders. Two sort of in front, one by the cages. |
| 76 – Quidditch Field | Depulso or Wingardium Leviosa | Roll boulder down the hill. Boulder is on the rock above. |
| 77 – Quidditch Field | Lumos | Move the moths into the 3 open holed boulders. One set is on the bridge, one set is north and it can go to the boulder up on the cliff by the waterfall, third set is across the stream. |
| 78 – Quidditch Field | Confringo | Destroy the 5 boulders. |
| 79 – Lower Hogsfield | Accio or Wingardium Leviosa | Roll the balls into the depressions. One set right next to you. One set on the Lower Hogsfield side. One set northeast in the grass. |
| 80 – Spires/West Hogwarts Valley | Accio or Wingardium Leviosa | Roll balls into the depressions. Technically northwest of West Hogwarts Valley, (and no where near Keensbridge) but you fly over it doing balloons for Madam Kogawa’s Assignment 2 and it has the marker of Keensbridge Tower. One to the south – balls are up on the right behind a breakable rockwall. One depression to the south and up on a rock, balls are across it in the tent. One depression to the east between the spires, balls are up on a rock to its north. |
| 81 – Aranshire | Depulso or Wingardium Leviosa | Roll the boulder down. It’s up the road by the well. Not part of the bandit camp that’s up higher. |
| 82 – Brocburrow | Touch the tops | You can either climb/jump across the tops of all of them or ride your broom across as long as you brush the tops. |
| 83 – Keenbridge #2 | Basic | Destroy the 9 orbs. It’s amongst ruins. 3 next to you, 3 up on the ruins behind you, 3 inside the ruins to the side where most like ashwinders are. |
| 84 – Keenbridge #2 | Lumos | Move the moths into the 3 open holed boulders. One set is under the bridge. Go to the far side and you should be able to draw them. |
| 85 – Keenbridge #2 | Confringo | Destroy the 5 boulders. |
| 86 – Keenbridge #2 | Touch the tops | You can either climb/jump across the tops of all of them or ride your broom across as long as you brush the tops. |
| 87 – Northern South Sea Bog | Reparo | Use reparo on 3 different statues that fall apart. One between the tents. |
| 88 – Northern South Sea Bog | Lumos | Move the moths into the 3 open holed boulders. One set is behind the really big tree to the south. Another set is behind the boulder to the east. |
| 89 – Feldcroft Catacombs | Basic | Destroy the 9 orbs. |
| 90 – Feldcroft Catacombs | Lumos | Move the moths into the 3 open holed boulders. One is high up on a cliff to the west? One down the path. And one up on a high cliff again. No fall damage. |
| 91 – Irondale #2 | Confringo | Light the 3 pyres. |
| 92 – Marunweem Lake | Depulso and Wingardium Leviosa | Use depulso on the spinny thing to open the door and then wingardium leviosa on the boulder to bring it out and put it in its depression. |
| 93 – Clagmar Castle #2 | Lumos and Depulso | Move the moths into the 3 open holed boulders. You’ll need to use depulso on the spinny thing to be able to use the elevator. Gather all of the moths at one time, stand as close to the elevator as you can, use depulso to lower the elevator, switch back to lumos and get on. They should all come with you. |
| 94 – Irondale West | Confringo | Destroy the 5 boulders. |
| 95 – Rockwood castle West | Touch the tops | You can either climb/jump across the tops of all of them or ride your broom across as long as you brush the tops. |