This post is maps of the Can Collector can locations in Xion, the Wasteland and the Great Desert since we can get maps there.
For the other cans, see the Google Workbook: Can Collector List
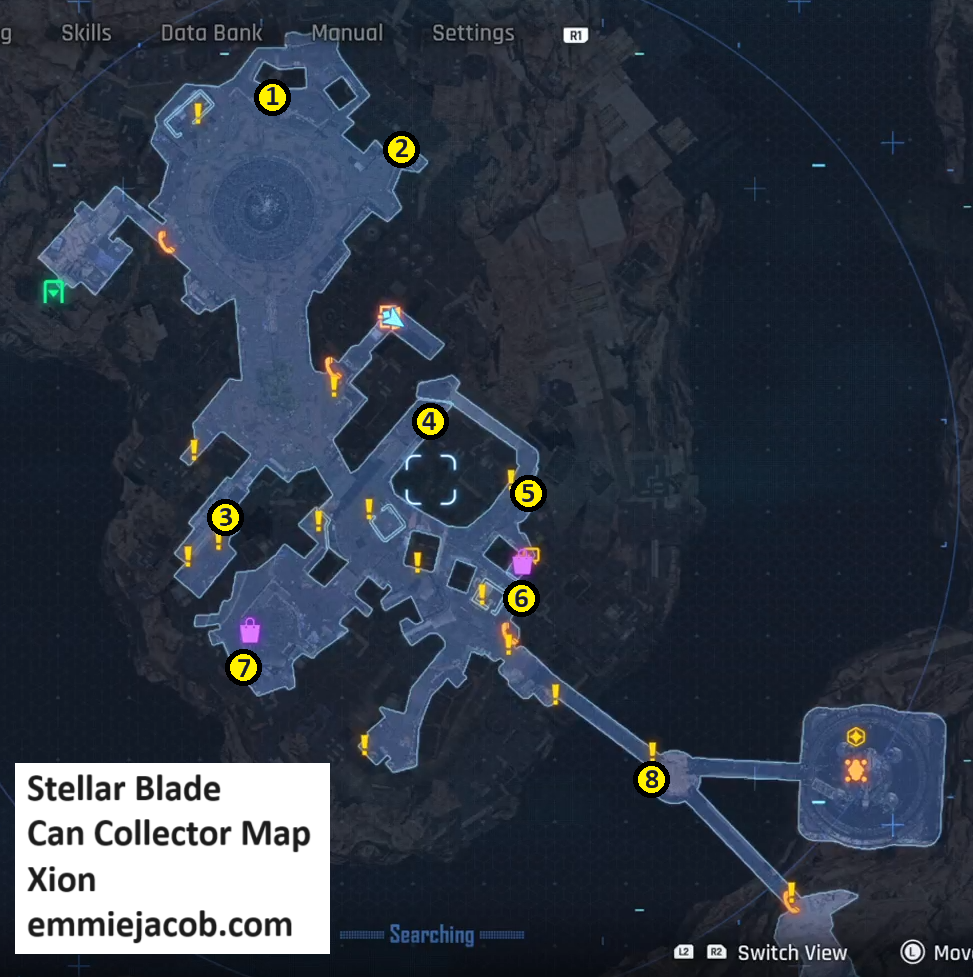
Xion Can Collector Map
- Pixie – Dress shop right of Barry’s
- The Machinetta Caramel Macchiato – Fiz drink machine to the right of Delloih’s
- Behemoth Red – Head southwest. Fiz machine.
- The Machinetto Americana – Go north, upper level right of the stairs. Fiz machine.
- Dionysus C – Turn left to go to R’s Shop, go up the steps but continue straight.
- Bayern Weissbier Dunkel – Lower alleyway in front of R Shop.
- Mountain Sparkle Mont Blanc – Fiz machine on the upper level.
- GrainT Oolong – On the bridge to the safehouse at the fork is a rope heading down. This is a jump past the supply box.
Wasteland Can Collector Map
- Corsair Lager – West of Scrap Plains amongst the turrets. In the northwest corner, interact with the terminal to lower one of the 2 platforms, then hide and shoot out the turrets with stinger missiles. Pull the lever again and make it to the lower platform.
- Bayern Hefe Weissbier – Fiz machine on the path between Central Scrap Plains and Wasteland Basin
- Elixir Green – Central Scrap Plains Camp, go into the section to the north and over to the two cages.
- Cryo the Clear – On the way down, go through the gate
- The Haven Green Tea – Start at the Junkyard Supply Camp and go northeast up the ramp. Look down the cliffside and use scan to see 3 beams that you can shoot to free the yellow droid underneath. He’ll give you the can.
- GrainT Corn – In the skinny nw/se path that’s southeast from the starting camp is a LAB sign and a Fiz drink machine.The machine is between the LAB and Northlake Mall signs.
- Pixie Zero – From the Solar Tower, go up the ramp, over to the east cliff side and jump east. Look down to the southeast and see the sticks below. Use those and handholds to make your way around the cliffs until you see a ladder. You need double jump for this.
- Potential Tempest – Double stacked cannister to the right of the solar tower. Activate the terminals in the area to open the box. Move the yellow box over and climb up.
- Mountain Sparkle Halla – From the camp, go north to handholds and climb up.
- Cryo Zero – Northwest of Central Great Canyon on the map is a cluster of 5 rock formations. The starting box is on the north. Shoot the dart board and follow it through the cluster and shoot it 2 more times. 1 – at the box, 2 – go south between them, 3 – go south again past the next formation and then turn east.
- Cryo Café Original – Go through the “ship” to the cliffside and turn left. It’s on the ground.
- Behemoth Green – Solve the puzzle supply box. Put the balls in the missing slots. The 5th ball is to the south by the dozer and lumps.
- Nectar Orange – Central Great Canyon camp, Bottom sign. The yellow thing you climb up on is over to the north a little. Drag it over.
- GrainT Barley – In the gated area behind the Altess Levoire Supply camp outside of Altess Levoire. Get here by climbing up over the shortcut gate back to the elevator down from the junkyard area.
- The Machinetta Café Latte – Down in the southeast corner (in The Plant area). You can get this during the Incarceration side-mission. Move the 3 moveable objects onto the lit floor area near each one and a supply box will drop from above.

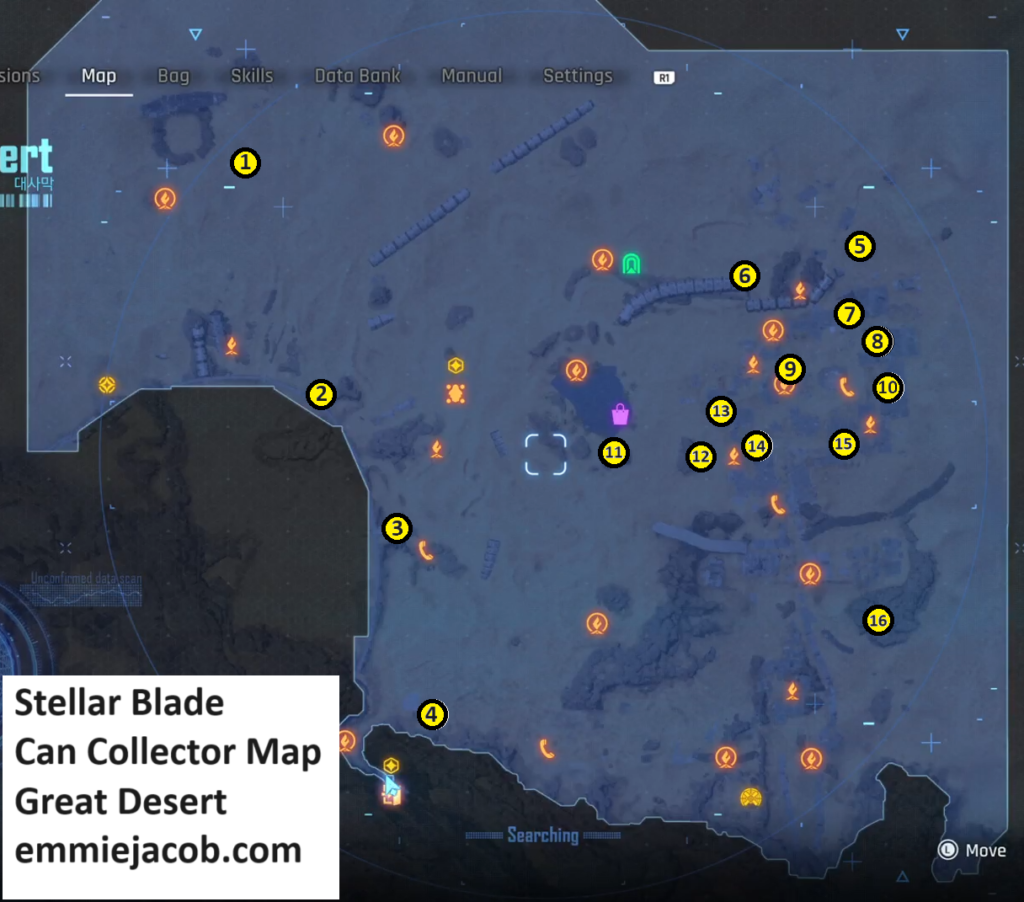
Great Desert Can Collector Map
- Cryo Café Mocha – Go west from the camp, past the debris fields to see a cooler sitting on some crates. Just shoot the 3 dart boards.
- Milky Pop Zero – Using scan, locate the rock formation with the body on top. Start on the north and go up. Shoot the dart board for a rope to jump to.
- Nectar Cranberry – Find the waypoint phone south of the Northern Great Desert Legion camp and jump the drones around. Jump, double jump, double jump dash
- Newfoundland Dry Zero – Full disclosure, I looked this one up. From the Exile’s Passage supply camp, go out into the desert and find the lesser lurkers digging in the grass. Kill them and then shoot the crate. Honestly, just look up a video that will lead you right to it. Idk how anyone found this one the first time.
- Liquid Fire – In the ruin at the northeast tip of the broken hypertube. Stand in the square and shoot the explosive cannisters.
- Haven Earl Grey – On top of the east end of the hypertube that’s north of the supply camp
- The Haven Milk Tea – The 4, 6, 7 puzzle. Put the movers (some are behind explosive walls) on the spots to make 4, 6, 7
- Behemoth Black – Little northeast of the Dome (Opera House) Put the yellow movers on 12, 2, and 13 slots.
- Johnson’s Highball Ginger – Just west of the dome by the explosive barrels. Fiz machine.
- Mountain Sparkle Everest – From the Dome (Opera House), find the Middle Path between Ruins Legion Camp and continue around. Move the yellow mover to block the lasers. Beware, 2 waves of about 6 enemies each will come at you.
- Nectar Grape – Fiz drink machine south of Clyde.
- Starwell – Full disclosure, I looked this one up. Go west to the rocks area and you’ll see the can flash. Put a smart mine on top of it and when the lurker comes through it’ll unearth the cooler.
- Potential Frost – By the North of Buried Ruins camp, follow the neon arrow sign up to the rooftops. After the pole jump, lasers are blocking the supply box. Jump through them. Before the wall run.
- Cryo the Malt – Just inside the ruins is a yellow dead droid. He wants you to activate the rooftop stuff. On the last jump, it’s double jump dash.
- Liquid Nuclear – From the Dome (Opera House), climb into the ruins by the 3 lesser lurkers. It’s in the gated area.
- Johnson’s Highball Lemon – Find the freeway section and then the rock formation to the east. Go in the center and climb up the handholds.